Multi Connection Bonding VPN
This article is an archive. The software and hardware used updates frequently and the best solution may have changed by the time you are reading this.
About This Solution
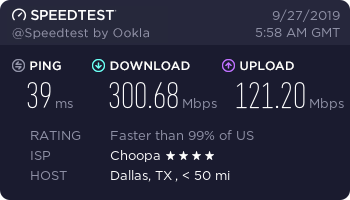
I have taken 3 unreliable cellular hotspots and turned them into one fast reliable connection. The core of this solution is a Raspberry PI 4 or 3B+ running a modified version of OpenWRT to enable Multi-Path TCP. To run this setup, you’ll need at least 2 Internet connections. You can merge the connections into one fast and redundant connection or setup a primary connection and a failover connection.
3 Bonded Cellular Connections
Shopping list
The links below are affiliate links to Amazon, using these links helps support future articles like this.
- Raspberry PI 4 Kit – You’ll need a kit that includes a fan and PI 4, 1GB model works fine for a router.
- RavPower PD Powerbank – I like this Powerbank because it has Power Delivery USB-C that allows it to be fully charged from empty in 4 hours.
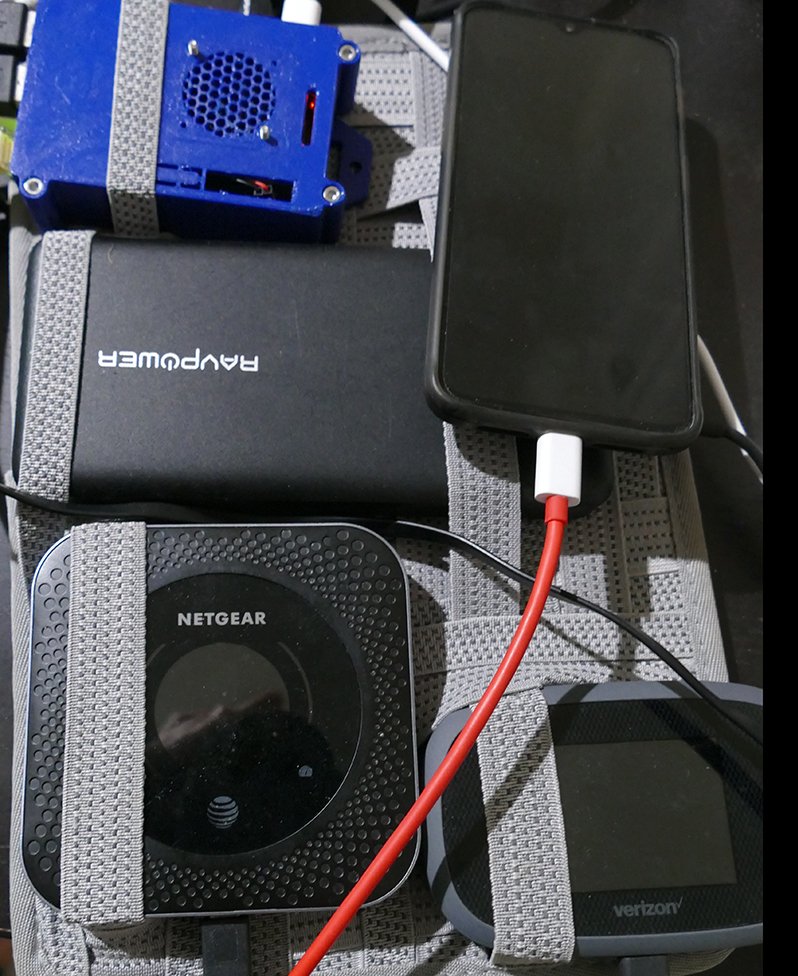
- Verizon 8800L Modem – With a recent firmware release (August 2019) this modem became much more reliable. This modem can be tethered to the PI Router via USB or WiFi. Using this for a Verizon Unlimited Data Plan but have heard the 8800L, 7730L and 6620L may work on the Visible $40/month unlimited data plan.
- Netgear Nighthawk MR1100 – Using this to connect to AT&T unlimited data. When unlocked this should work on other GSM networks.
- OnePlus 6T – Using this with Tmobile Unlimited Phone Plan with Hotspot. This phone can share its connection to the PI Router via WIFI or USB. One downside of this phone is it can’t share its Data Connection and then use the Bonded VPN for apps. Tested the Samsung Note 10+ and it can share its connection cellular data connection then use a different wifi connection.
- Tenda 150 Wireless 2.4G USB Adapter – This enables the PI to connect to additional wireless networks and is low power. 3 of these have been successfully added to the PI 4 without getting errors about insufficient power.
- Cocoon Grid-It 8×12 – Useful to keep all these parts and cables organized in a backpack
Building Your Kit
The internal access point on the PI 4 works but must be set to a specific channel and is limited to 54mbit. Set Mode to AC, Channel 36, Width 20 Mhz, Transmit Power 11 dBM, then under Advanced, set country to US.
The PI 4 generates more heat than the PI 3B+ and needs a fan and case with ventilation. Indoors I found a 5v 30mm fan hooked up to 3 volt power generates sufficient cooling and is quiet. In warmer environments you’ll probably need the fan hooked up to the 5v headers on the PI 4.
My case is 3d Printed from a slightly modified design from mkellsy on Thingiverse. PETG is used instead of PLA for strength and heat tolerance. In the summer PLA can warp just from sun exposure.
Connecting Your Cellular Modems
You can connect your modems via USB or WIFI. USB gives the best speed and lowest latency but can be slightly less reliable. You also need all your modems to be fully charged before hooking them up to the PI. If one modem isn’t fully charged it could draw too much USB power and cause a low voltage error. A solution to this is USB 3.0 Female to Dual USB Male Y Extension cable. Another potential solution is getting a powered USB hub. Both of these solutions will require an additional power source.
Bonding all of your connections via WiFi is probably the simplest and fastest way to get started, but you need multiple USB WiFi Radios. Tenda USB WiFi adapters have drivers built in and are low power usage. The only downside of these adapters is they are 2.4Ghz wifi only.
Portable USB Power
If you want to put this bonding solution into a backpack, here are some recommended portable power solutions…
MaxOAK 50,000 MAH. This powerbank provides 12V barrel jack, 2x 1amp USB and 2x 2amp USB ports. This is good for powering an external access point for 24 hours or charging many accessories like USB speakers or YI 4K camera. The downside of this battery bank is there is no PD Power Delivery, USB-C connectivity and it is too large to be transported on an airline.
RavPower PD 26800 is an airline friendly power banks that has USB-C and can charge fully in 4 hours. Can keep the setup shown on this page connected with moderate internet access for 9 hours. Haven’t tested with wifi only bonding, but that should last even longer than usb tethering. This powerbank has been tested and can power the PI 4 via USB-C cable from its USB-C port.
Setting up the VPN
The PI Router must connect to another connection to aggregate all of the lower quality connections into one larger connection. Hosts that have been tested successfully are Vultr and OVH.
You’ll want to test several locations to see which on you get the most bandwidth from and bandwidth quality on Virtual Machine quality can vary depending on your provider. We have tested Debian 9 the most and it seems very stable.
Setting Up OpenMPTCPRouter (PI Software)
2019-09-07You don’t need a very large micro sd card but if the card is at least a Class 10 card it will allow the system to boot quickly.
Connecting to the Improved Network
The internal wireless radio on the Raspberry PI isn’t the best but its good for around 54 mbps speed. If you want the best wireless connectivity you can plug virtually any wireless router’s WAN Port to the PI’s Ethernet. Try to find a router with a Gigabit LAN port since this bonding solution can exceed 100mbps.